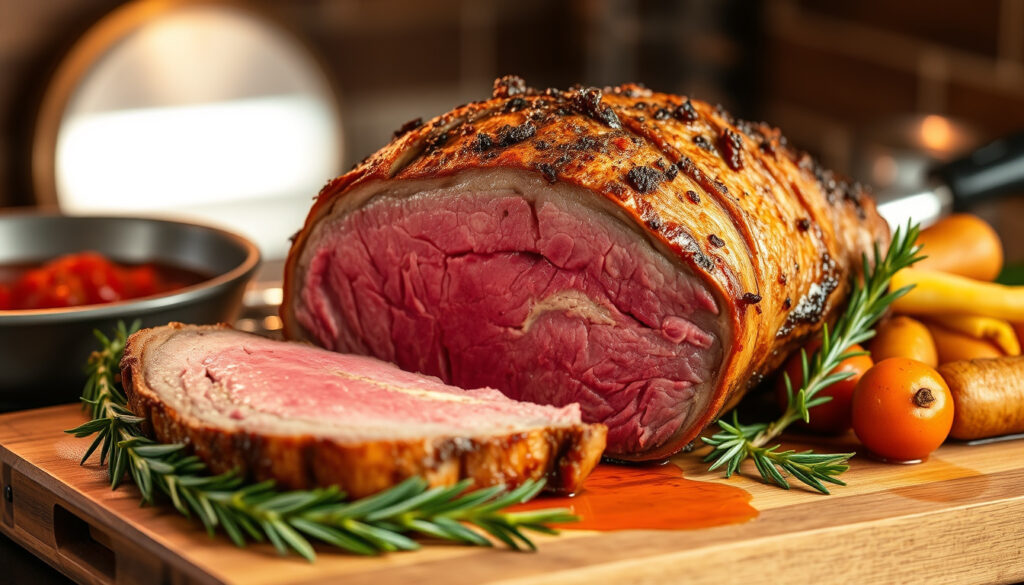
How to Cook Melt-in-the-Mouth Roast Beef – Low and Slow Oven Guide
Achieving that coveted melt-in-the-mouth texture with roast beef requires understanding the relationship between heat, time, and the science of muscle tissue transformation. The technique combines a high-heat sear to develop flavor with extended low-temperature cooking that allows collagen to convert into silky gelatin, resulting in beef that practically dissolves on the tongue.
Whether you’re preparing a traditional Sunday roast or hosting a special occasion dinner, the method remains consistent: careful preparation, precise temperature monitoring, and adequate resting time make the difference between a tough, overcooked joint and one that showcases the tender, succulent quality home cooks consistently aim for.
This guide covers the complete process from selecting the right cut through to carving the finished roast, with specific attention to oven temperatures, timing calculations, and the techniques that professional sources recommend for predictable results.
How to Cook Melt in the Mouth Roast Beef in the Oven
The oven method provides the most reliable results for achieving tender, juicy roast beef with that desirable melt-in-the-mouth quality. Success depends on two distinct phases: an initial high-heat blast that creates the savory crust, followed by extended low-temperature cooking that transforms tough connective tissue into soft, yielding texture.
Collagen, the primary component of connective tissue in beef, begins converting to gelatin at temperatures above 60°C (140°F). This transformation requires sustained heat exposure over time, which is why low-and-slow cooking produces such dramatically different results compared to rapid high-heat methods.
The following overview captures the essential parameters that most recipe sources identify as critical for successful results:
- Best Method: Low-and-slow oven roasting at approximately 135°C (275°F)
- Critical Temperature: 50-52°C (120-125°F) internal for rare doneness
- Timing Standard: 12-15 minutes per pound (450g) at low temperature
- Essential Step: 20-30 minutes resting time tented with foil
These parameters apply across different cuts, though cooking times vary based on size and shape. The key insight shared across authoritative sources is that precision with temperature measurement trumps time-based guessing. A meat thermometer eliminates the uncertainty that leads to either undercooked or overcooked results.
Preparation begins well before the oven reaches temperature. Removing beef from refrigeration 1-2 hours before cooking allows the joint to reach room temperature, promoting more even heat distribution throughout during roasting. Sources including Jamie Oliver and Kit’s Kitchen emphasize this step as fundamental to consistent outcomes.
The seasoning approach combines simple ingredients applied generously. Most sources recommend approximately one teaspoon of kosher salt per pound of beef, along with black pepper and crushed garlic cloves. Rubbing the surface with olive oil or melted butter helps the seasoning adhere while contributing to browning. Some cooks create deep slits in the meat and insert garlic pieces for additional flavor penetration.
The searing phase, while optional according to some recipes, is strongly recommended by the majority of sources. Browning all surfaces in a hot frying pan, cast iron skillet, or Dutch oven over medium-high heat develops the Maillard reaction compounds that create complex savory flavors and an appealing crispy crust. This typically requires 10-15 minutes total and should occur before the beef enters the oven.
| Beef Cut | Recommended Weight | Approximate Total Time | Best For |
|---|---|---|---|
| Prime Rib / Ribeye Roast | 1.5-2kg (3-4 lb) | 1.5-2.5 hours | Special occasions, rich marbling |
| Sirloin Roast | 1-1.5kg (2-3 lb) | 1-1.5 hours | Lever texture, leaner option |
| Topside | 1.5-2kg (3-4 lb) | 2-3 hours | Budget-friendly, good for slow cooking |
| Chuck Roast | 1.5-2kg (3-4 lb) | 3-4 hours | Maximum tenderness, collagen-rich |
| Rump Roast | 1-2kg (2-4 lb) | 1.5-2.5 hours | Good flavor, moderate price |
| Beef Brisket | 2-3kg (4-6 lb) | 4-6 hours | Extremely tender, traditional smoking cut |
Organic or grass-fed beef is recommended by several sources for superior flavor and natural tenderness. These cuts typically feature better marbling and response to the low-and-slow cooking method.
Roast Beef Cooking Time Guide
Understanding how cooking time relates to weight and desired doneness eliminates the guesswork that produces inconsistent results. The calculations below provide baseline estimates that home cooks can adjust based on their specific oven and cut characteristics.
Calculating Your Cooking Time
The standard calculation recommended by recipe sources involves multiplying the weight of your joint by the minutes-per-pound rate, then adding time for the initial sear and final resting. A typical formula looks like this:
- Base Time: Weight (in pounds) × 12-15 minutes
- Sear Time: Add 10-15 minutes if pre-searing in a pan
- Rest Time: Plan 20-30 minutes before carving
For a 4-pound (1.8kg) joint using the low-and-slow method at 275°F (135°C), expect approximately 1 hour of oven time plus preparation and resting phases. Larger joints require proportionally more time, with each additional pound adding roughly 12-15 minutes of cooking.
UK-style fan oven conversions differ slightly from conventional oven calculations. When using a fan oven, reduce the temperature by approximately 20°C compared to a conventional oven setting. A recipe calling for 180°C in a conventional oven would translate to 160°C in a fan-assisted model.
Fan ovens require lower settings than conventional ovens. UK recipes frequently reference Gas Mark 9 (240°C/475°F) for initial browning and Gas Mark 4 (180°C/350°F) for extended roasting. Always preheat your oven for at least 20-30 minutes to ensure stable temperature before placing the beef.
Doneness Temperature Chart
Using a meat thermometer provides the most reliable indicator of when your roast has reached the desired doneness. The temperatures below represent the final internal temperature after resting, which will be 5-15°F higher than when you remove the beef from the oven.
| Doneness Level | Final Internal Temp (After Resting) | Pull-From-Oven Temp | Visual Description |
|---|---|---|---|
| Rare | 50-52°C (120-125°F) | 46-49°C (115-120°F) | Cool red center |
| Medium Rare | 55-57°C (130-135°F) | 50-52°C (115-125°F) | Warm red center |
| Medium | 60-63°C (140-145°F) | 55-57°C (130-135°F) | Pink and juicy |
| Well Done | 70°C+ (160°F+) | 65°C+ (150°F+) | No pink, firmer texture |
Insert the thermometer probe into the thickest part of the joint, avoiding contact with bone or excessive fat deposits. Bone conducts heat differently and can give misleading readings. The thermometer should be placed in the center of the muscle mass for the most accurate representation of overall doneness.
Perfect Roast Beef Recipe for Tenderness
Creating a roast beef with exceptional tenderness involves following a systematic approach that addresses each factor contributing to the final texture. The method described here synthesizes recommendations from multiple recipe sources, combining preparation techniques, cooking methodology, and finishing procedures.
Preparation Phase
Begin with a joint that has been properly trimmed of excess external fat while preserving the flavor-enhancing layer. Remove the beef from refrigeration at least one hour before cooking, allowing the internal temperature to equalize throughout the joint. This step prevents the exterior from overcooking while the center reaches temperature.
Pat the surface completely dry with paper towels. Moisture on the surface inhibits proper browning and prevents the Maillard reaction from developing the characteristic crust. Apply kosher salt generously—one teaspoon per pound of beef—and allow it to rest on the surface for 15-20 minutes. This draws out moisture which then dissolves the salt, creating a brine that flavors and tenderizes the outer layer.
Rub the surface with olive oil or melted butter, then apply black pepper and smashed garlic cloves. For deeper flavor penetration, create pockets by inserting a sharp knife into the meat at intervals and stuffing each slit with additional garlic and seasoning.
Oven Roasting Procedure
Preheat your oven to 220-240°C (425-475°F, Gas 9) for the initial phase. Place the beef on a wire rack in a roasting pan, elevating it above the base to allow heat circulation and even browning. Add aromatics to the pan—quartered onions, whole garlic cloves, sprigs of rosemary and thyme—which will flavor the drippings and provide the foundation for a pan sauce if desired.
Pour beef broth and dry red wine into the base of the roasting pan—approximately half a cup of each for a 4-pound joint. These liquids create steam that maintains moisture around the beef during cooking while developing complex flavors in the pan drippings.
Roast at the high temperature for exactly 15 minutes. This initial blast creates the savory crust through the Maillard reaction while beginning the collagen conversion process. After this period, reduce the oven temperature to 160°C (320°F fan oven) or 180°C (350°F conventional oven), or approximately 275°F (135°C). Continue roasting until the internal temperature reaches the target for your preferred doneness.
Never skip the resting period after removing beef from the oven. During cooking, the muscle fibers contract and push juices toward the center. Resting allows these fibers to relax and reabsorb moisture throughout the meat. Cutting too soon results in significant juice loss and a dry, tough texture. The temperature will continue rising 5-15°F during rest, so account for this carryover when determining pull-from-oven timing.
Resting and Carving
Transfer the roasted beef to a clean cutting board and tent loosely with aluminum foil. Allow 20-30 minutes of rest time—longer for larger joints. During this period, the internal temperature stabilizes and the fibers relax, enabling the meat to retain maximum moisture when sliced.
Carve against the grain into uniform slices approximately half an inch thick. The grain direction is visible as parallel lines on the surface of the roast. Slicing perpendicular to these lines shortens the muscle fibers, creating the perception of tenderness in each bite. Serve immediately while the meat is still warm.
How to Cook Melt in the Mouth Roast Beef Slow
The slow cooker method offers an alternative approach for achieving melt-in-the-mouth tenderness with minimal hands-on attention. This technique proves particularly effective for tougher cuts containing abundant collagen, which transforms into gelatin during extended low-temperature cooking.
Begin by searing the beef in a hot pan as you would for oven roasting. This step develops flavor compounds that won’t form during the slow cooker’s gentle environment. Brown all surfaces thoroughly before transferring to the slow cooker insert.
Add sufficient liquid to the slow cooker—beef stock forms the foundation, with dry red wine contributing depth. Layer aromatics including sliced onions, crushed garlic, and fresh herbs such as rosemary and thyme sprigs. The beef should sit above the liquid level, with steam providing moisture rather than submersion.
Set the slow cooker to its lowest heat setting and cook for 6-8 hours for a 1.5-2kg joint. This extended duration allows collagen to fully convert to gelatin, creating the characteristic silky texture that defines melt-in-the-mouth beef. The sustained temperature of approximately 70-80°C provides ideal conditions for this transformation without risk of overcooking.
The slow cooker method eliminates the need for precise temperature monitoring, as these appliances maintain remarkably consistent heat levels. This makes it suitable for busy schedules or when attending to other meal preparation. The closed environment also excels at moisture retention, preventing the surface drying that can occur with oven roasting.
For additional tenderness, some cooks employ an oven bag during roasting, which creates a similar moisture-retention environment. Rotate the bag every 10-15 minutes to ensure even heat distribution and prevent any single area from overcooking.
Step-by-Step Timeline for Roasting
The complete process from raw ingredient to carved roast involves sequential stages, each contributing to the final quality. Understanding this timeline helps plan meal preparation and ensures adequate time for each critical phase.
- Day Before or Morning: Remove beef from refrigerator and allow to reach room temperature (1-2 hours minimum)
- 30-45 Minutes Before Cooking: Pat dry, apply salt generously, and allow to rest while oven preheats
- 20-30 Minutes Before Cooking: Preheat oven to 220-240°C (425-475°F), prepare aromatics and liquids
- 10-15 Minutes Before Oven: Sear all surfaces in hot pan until deeply browned, then transfer to roasting rack
- 0:00: Place beef in preheated oven at high temperature
- 0:15: Reduce temperature to low setting (160°C/275°F), add liquid to pan if needed
- Remaining Cooking Time: Continue roasting, checking thermometer periodically during final 30 minutes
- Pull Target: Remove from oven when internal temp is 5-15°F below target final temperature
- 0:00 Rest: Transfer to carving board, tent with foil, rest 20-30 minutes
- Final: Carve and serve immediately with chosen accompaniments
Understanding Doneness: What Science Tells Us
The relationship between temperature and beef doneness is well-established through culinary science and verified through countless cooking applications. Different temperature ranges produce measurable changes in muscle protein structure, moisture content, and perceived tenderness.
The doneness temperatures cited in this guide align with both USDA food safety recommendations and traditional UK culinary standards. For food safety, the USDA recommends a minimum internal temperature of 63°C (145°F) for beef roasts. However, for texture and traditional serving preferences, many cooks prefer medium-rare results at lower temperatures, particularly when using fresh, high-quality beef from trusted sources.
| Factor | Established Understanding | Variables Affecting Accuracy |
|---|---|---|
| Thermometer Placement | Center of thickest muscle mass | Bone proximity, fat distribution, probe depth |
| Carryover Cooking | 5-15°F temperature rise during rest | Joint size, initial temperature, resting method |
| Collagen Conversion | Complete at sustained 70°C+ for 1+ hours | Cut type, aging, initial tenderness |
| Rest Duration | 20-30 minutes minimum for large joints | Personal preference, serving timing requirements |
The exact temperature at which a joint reaches a specific doneness depends on several factors including the starting temperature of the beef, the accuracy of oven temperature calibration, and the thermal mass of the specific cut. These variables explain why cooking times provide approximate guidance rather than precise guarantees.
Why Melt-in-the-Mouth Texture Develops
The melt-in-the-mouth quality that characterizes perfectly cooked roast beef results from a combination of factors related to both the inherent properties of the meat and the cooking methodology applied. Understanding these factors helps home cooks make informed decisions throughout the preparation process.
Beef contains varying proportions of muscle fibers and connective tissue depending on the cut. Cuts from well-exercised areas of the animal, such as the chuck and brisket, contain more collagen-rich connective tissue. This tissue begins converting to gelatin at temperatures above 60°C, and the transformation accelerates with extended exposure. The result is a rich, silky mouthfeel that distinguishes slow-cooked beef from quick-cooked preparations.
Fat marbling contributes to tenderness by lubricating muscle fibers during cooking. Prime rib and ribeye cuts feature characteristic fat veins throughout the muscle, which melt during cooking and baste the meat from within. This intramuscular fat carries flavor compounds while preventing the muscle fibers from drying out during the extended cooking period.
The low-and-slow approach minimizes moisture loss by maintaining temperatures below the point where rapid moisture evaporation occurs. At 135°C (275°F), cooking proceeds slowly enough that moisture has time to redistribute throughout the meat rather than being driven to the surface and evaporating. This explains why high-heat methods can produce similarly tender centers but with much drier exteriors.
The key to melt-in-the-mouth beef is patience. Low temperatures over extended time allow the collagen to fully convert to gelatin, creating that silky, tender texture that makes the effort worthwhile.
— Kitchen’s Kitchen Recipe Guide
Key Sources for This Guide
The information presented draws from several established recipe sources that specialize in traditional and contemporary approaches to roast beef preparation. Each source provides verified techniques and tested parameters that inform the recommendations in this guide.
Jamie Oliver’s Perfect Roast Beef methodology emphasizes the combination of high initial heat with subsequent low-temperature roasting, providing detailed timing guidance for achieving consistent medium-rare results.
Kit’s Kitchen’s approach to melt-in-your-mouth roast beef focuses on the 275°F low-and-slow technique, offering practical calculations for time-per-pound that readers can apply to their specific joint sizes.
R Hug’s organic roast beef guide provides weight-based timing recommendations for UK fan ovens, with particular attention to the preparation techniques that maximize tenderness when using premium organic beef cuts.
The USDA Food Safety and Inspection Service maintains current guidelines regarding safe minimum internal temperatures for beef, which informed the temperature recommendations in this guide.
Summary
Achieving melt-in-the-mouth roast beef requires combining proper technique with appropriate timing and temperature control. The oven method using initial high heat followed by extended low-temperature roasting produces reliable results across a range of cuts. Essential steps include bringing the beef to room temperature before cooking, searing for flavor development, monitoring internal temperature with a reliable thermometer, and allowing adequate resting time before carving. For those seeking a hands-off approach, the slow cooker method delivers comparable tenderness, particularly with collagen-rich cuts that benefit from extended gentle heat.
The key variables—temperature, time, and resting—work together to transform tough connective tissue into silky gelatin while preserving moisture within the muscle fibers. Understanding why each step matters helps home cooks adapt the technique to their specific ingredients and preferences, whether they prefer rare, medium, or more thoroughly cooked results.
Frequently Asked Questions
What is the best cut of beef for melt-in-the-mouth roast beef?
Prime rib, ribeye roast, sirloin roast, chuck roast, rump roast, and beef brisket all work well for melt-in-the-mouth results. Cuts with good marbling or abundant collagen respond best to the low-and-slow cooking method.
How long should roast beef rest before carving?
Allow 20-30 minutes of rest time tented with foil before carving. During this period, the internal temperature continues rising by 5-15°F and muscle fibers relax, enabling the meat to retain maximum juices.
Is the slow cooker or oven method better for tenderness?
Both methods can produce excellent tenderness when applied correctly. The oven method provides more control over browning and crust development, while the slow cooker excels at moisture retention and requires less monitoring. Choose based on your schedule and preference for hands-on involvement.
Do I need to sear the beef before roasting?
While not strictly required, searing is strongly recommended by most recipe sources. The Maillard reaction creates complex flavor compounds and an appealing crust that won’t develop during low-and-slow oven roasting alone. Budget 10-15 minutes for thorough browning in a hot pan.
What temperature should roast beef be for medium rare?
For medium rare, target a final internal temperature of 55-57°C (130-135°F) after resting. Remove from the oven when the thermometer reads 50-52°C (115-125°F) to account for carryover cooking during the resting period.
Can I use a fan oven for roast beef?
Yes, fan ovens work well for roast beef. Reduce the temperature by approximately 20°C compared to a conventional oven setting. For example, 180°C conventional becomes 160°C fan. Always preheat thoroughly for best results.
Why does my roast beef turn out tough?
Tough results typically stem from inadequate resting time, cooking at temperatures that are too high, insufficient moisture during cooking, or not using a meat thermometer to monitor doneness. The low-and-slow approach at 135°C (275°F) with proper resting should yield tender results.
What should I serve with melt-in-the-mouth roast beef?
Traditional accompaniments include Yorkshire puddings, roast potatoes, parsnips, carrots, and rich gravy made from the pan drippings. These sides complement the tender beef and complete a classic Sunday roast dinner.
More related posts
 Weather in Derby 10 Days – Met Office Forecast, Temps and Alerts
 Autumn Wedding Guest Dresses – Best 2025 UK Guide for Over 50s
 Ray Bans – Your Complete Guide to Iconic Sunglasses
 Royal Academy of Arts – Your Complete Visitor Guide
 Racing Results Today Fast – Live Updates for UK & Ireland Meetings
 When Is Stranger Things Season 5 Coming Out – Release Dates and Episode Guide
 Chicken and Mushroom Risotto – Easy One-Pot Recipe Guide
 English Premier League Standings 2025-2026 – Live Table, Qualification, and Key Facts